How to take & post photos to your dental practice Facebook page
A picture is worth a thousand words... but nobody wants to actually read a thousand words – especially in their Facebook newsfeed! That’s why it’s so important to include images on your practice’s Facebook page.
Besides catching your patients’ attention, photos also give you extra (free!) exposure by taking up more room in their newsfeed. Vertical photos are especially good for this purpose.
When should you add a photo to one of your Facebook posts? Well, whenever there’s a good opportunity to show something off – or to make a post more visually interesting.
Here are some ideas to get you started:
- Write about a beautiful new floral delivery that’s been delivered to the waiting area – take a photo of the flowers!
- Wish a staff member a Happy Birthday – take a photo of them blowing out their birthday candles in the staff room!
- Update your practice on a new renovation taking place at the practice – take a photo of the progress!
- Write about decorating the practice for a major holiday – take a photo of the team hard at work, or take a photo of the finished decor!
Of course, there are times when you really don’t need a photo with a new post.
Here’s when a photo isn’t necessary:
- If you’re posting about a quick change in hours, or a holiday closure, there’s no need to add a photo because it’s just straight information
- If you’re announcing the winner of a contest, there’s no obligation to show a photo of the winner – although a picture of the prize would be nice!
- If you’re recapping a funny conversation with a patient, there’s no need to post their photo or name. You may also need patient consent to use their name and photo, so it’s easier to just recap your chat in general terms. Something like: “I just had a great chat with a long-time patient all about our favourite baseball team. Who are you rooting for during the playoffs? – Dr. Molar”)
So, how do you get a great photo? Well, the easiest way is to take a photo yourself, because then you never have to worry about copyright issues – “borrowing” a photo off the internet can lead to big problems.
You don’t need a fancy digital camera either. You’ll find that shooting and uploading photos directly from your smartphone can be much simpler and faster.
If you’re not familiar already with adding photos to social media posts, here are pain-free instructions to get you started. You might want to bookmark this page, or email it to yourself – anything to keep the info nearby and get you posting!
Digital camera photos:
- Take the photo on your camera
- Use a USB cable to plug the camera into a computer
- Transfer the photo onto the desktop, and rename it so it’s easy to find
- Proceed to “Uploading a photo to the practice’s Facebook page from a computer”
Uploading a photo to the practice’s Facebook page from a computer:
- Log into your Facebook account and click on your practice page. This takes you to the administrative screen where you can post as Your Practice Name.
- Find the status box that reads “What have you been up to?”
- Click on the little camera icon, and it will prompt you to choose a photo from your computer. Select the photo (or photos) you’d like to use, and click “Open.”
- Small versions of the photos will appear inside the status box, and if you hover your mouse over them, a tiny “X” will appear. Click the “X” if you want to remove any photos at this point.
- You’ll also see a grey dotted square next to the tiny versions of the photos, and if you hover your mouse over it, it will read “Choose a file to upload.” This is where you can add additional photos, if you’d like.
- Click in the status box, and type out a caption or other note to go with the photo(s). Unless a photo itself has a message written on it, it’s very important to put some wording along with any photos you post.
- When you’re happy with the text and the photo(s), read it one more time. Then click “Post.”
- You’re done!
Smartphone photos:
- Take some photo as usual using the camera app on your smartphone.
- The picture will disappear a second after it’s taken, but you should see a small thumbnail in the corner of the screen – showing you the photo you’ve just taken.
- Click on the thumbnail, which will bring up your “camera roll” (all the photos you’ve taken).
- Flip through the photos to find the best one.
- If you want to upload the photo to Facebook directly from your phone, read the next set of steps: “Uploading a photo to the practice’s Facebook page from your smartphone.”
- If you would feel more comfortable uploading the photo to Facebook from a laptop or desktop computer, proceed to “Sending a photo from your phone to a computer.”
Uploading a photo to the practice’s Facebook page from your smartphone:
- Download the free “Pages” app made by Facebook – you’ll find it on the Facebook website. This isn’t a requirement, but it makes it much easier to write posts and upload photos to a “corporate” Facebook account.
- Open the “Pages” app.
- Click the “Compose” button (it looks like a pen writing on a notepad).
- Click “Photo.”
- The app will automatically open your “camera roll.” Choose the photo (or multiple photos) you’d like to upload, and then click “Done.”
- The app will open a screen that says “Write something.” Now, write a caption to go with your photos. (You’ll also notice tiny thumbnails of your photos that are about to post – click “Cancel” if you realize you’ve selected the wrong ones.) Type out your caption, and then click “Post.”
- You’re done!
Sending a photo from your phone to a computer:
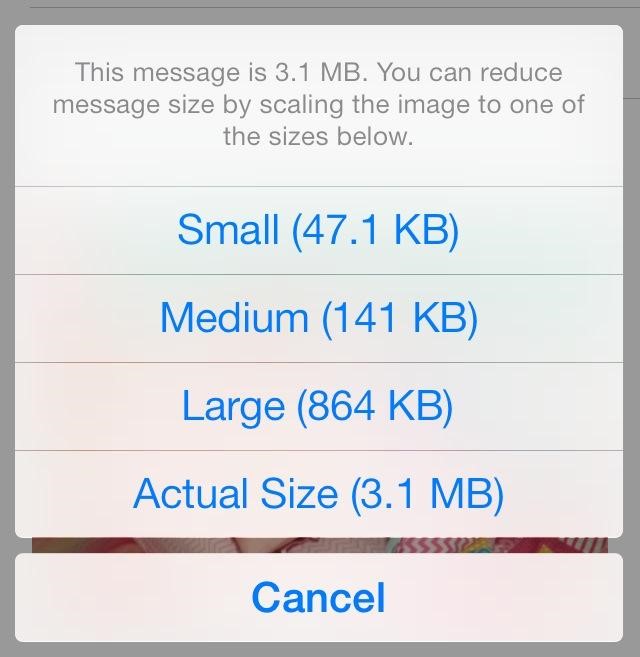
- Click the “Share” button and click “Next.” On an iPhone it looks like this: On an Android phone it looks ike this:


- Select the “Mail” option to email it.
- Email the photo to your own email address (or the email address you will be checking on the computer).
- If it asks you to choose a size for the photo, we recommend either “Medium” or “Large.” You don’t need a giant photo for Facebook.
- Once you have emailed the photo to yourself, check your email on a computer and complete the steps listed above in “Uploading a photo that’s on your computer.”
Posting photos might seem complicated at first, especially if you’re not a diehard Facebook user. But once you do it a few times, you’ll get the hang of it – and your practice’s Facebook page will look better than ever!
Want more ideas on what to post? Check out my last blog post Five Social Media Tips for Dentists.


How do you choose the best internet marketing agency for your dental practice?
This free PDF guide makes it easy to understand services like Website design, SEO, AdWords, and Facebook and helps you to make an objective decision.
 Download Now!